
Saturday, June 6, 2015
New Blog and website! HeathSmithPhotography.com
Well i just lunched a new site that gives in depth info on my image that i create and i show before and after images, how i got to the spot where i took the images, the things i was thinking about when i took the image. along with the camera settings, gear, and the number of shots it took. Well hope to see you there. Please come and see me at http://heathsmithphotography.com/

Friday, March 20, 2015
First Impression of the Sony A7R
So i just got a Sony A7R in the mail from DigitalRev.Com and i wanted to do a first impressions of it so far after 2 days of using it. very first impression of this was "oh my gosh it's so small!" This camera body is ridiculously small and it barely fits in the size of my hand which might be one of the downsides. After marveling at the size of it soon realize that most of my Canon lenses are going to be double the size of this body. One of the things that make this camera so special is the fact that you use adapters to use your current glass or vintage glass that is very unique to this camera system. I've been using only my Canon lenses on this so far and I'm going to separate focusing on it is sub par for what it should be doing. Just think of it as using your normal Canon camera in live you mowed and focusing like that all the time. However this camera does provide An excellent manual focusing system. The button layout is a little awkward at first however once you learn how to customize it, it then becomes quite fun.
Like i said, its more of a quick "hey i get this camera and going to test it out" so please stay tuned and i will post a video and a blog post about it soon!
Like i said, its more of a quick "hey i get this camera and going to test it out" so please stay tuned and i will post a video and a blog post about it soon!
Saturday, February 14, 2015
Shinjuku Best Photo Spots!

I have been living in Tokyo area for about a year now and i have found some of the best spots to photograph the local area and to capture the essence of this great part of Tokyo. It ranges from the back streets near the station to the high rise look outs that litter the area. Here is a Google Map that has all the local area marked out with a link to a image that i captured from that spot. Please enjoy and keep exploring!
Monday, February 2, 2015
Review of Oben CT-2381 Carbon Fiber Tripod Legs.
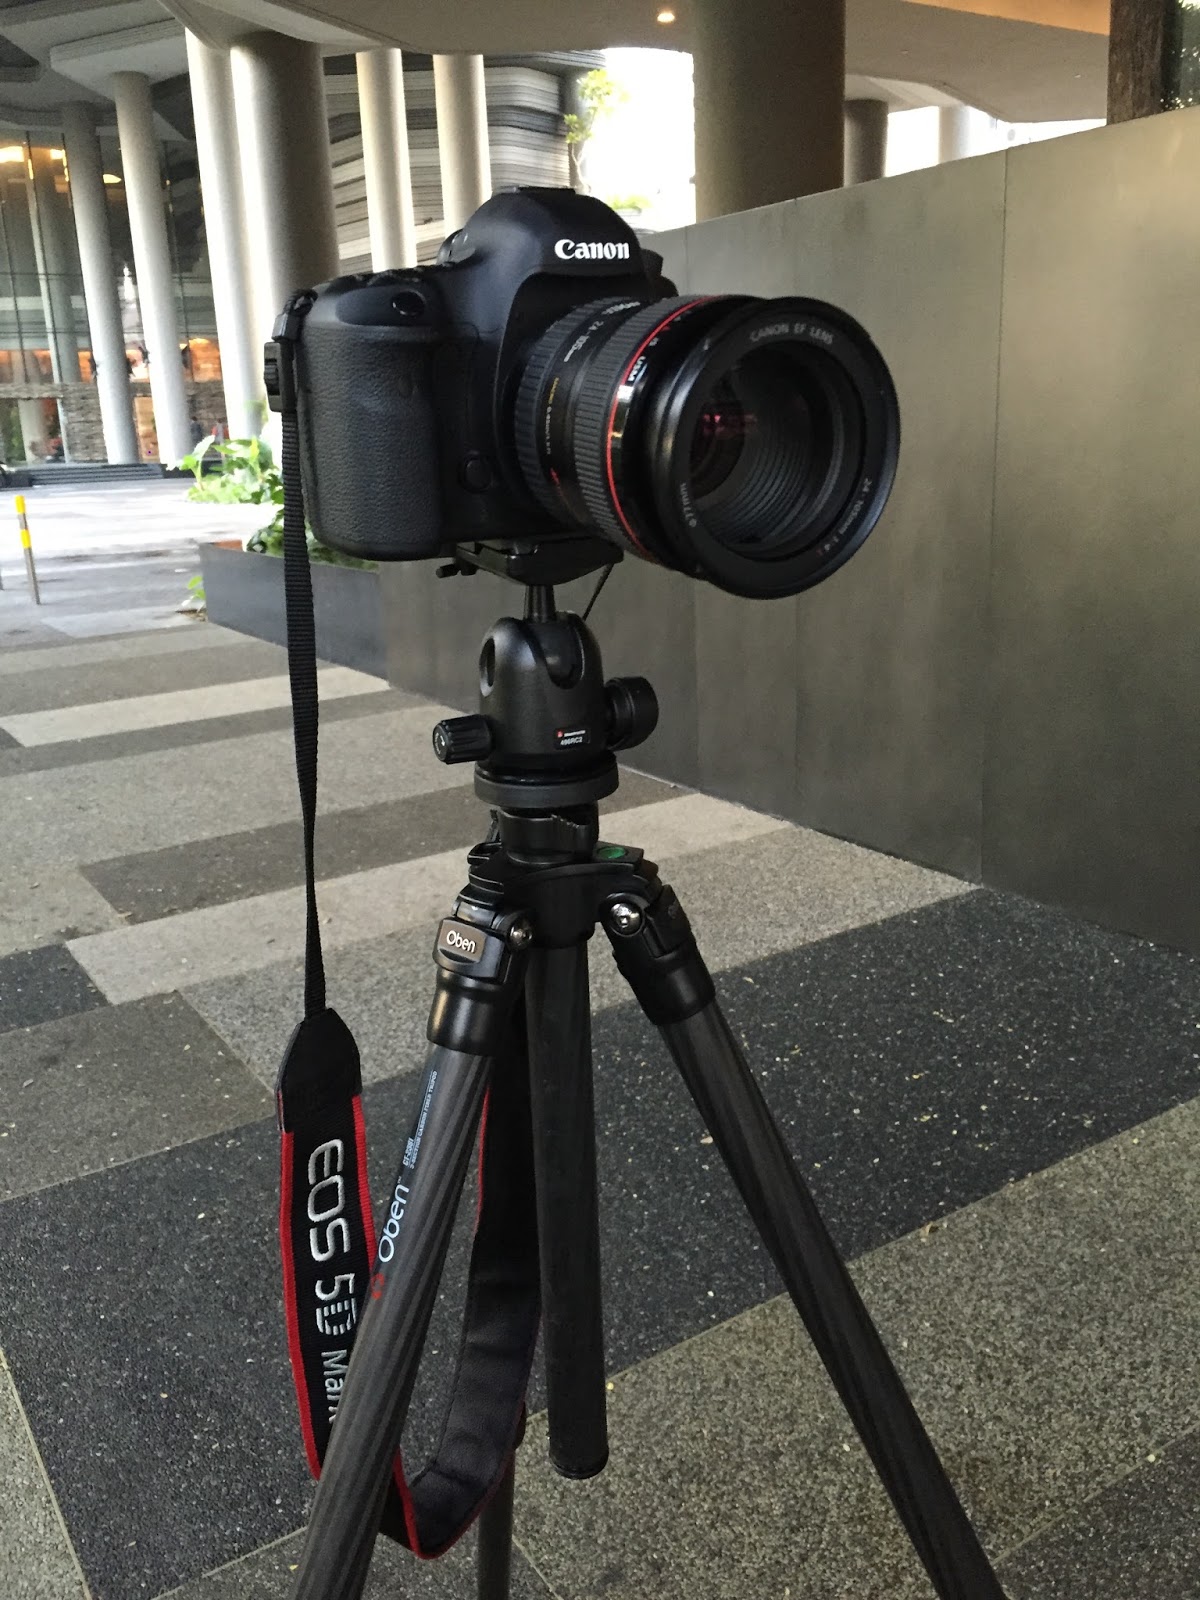 |
| Oben CT-2381 with 5Dm3 and 24-105mm |
1: It has to be carbon fiber Tripod cause i do a lot of traveling and traveling with a 4-5 lbs of cold metal just sucks.
2: Has to be at eye level with the center column not installed.
3: PRICE!! This is important to every Photographer starting out. Try and keep it down to about $300 USD.
So with the guild lines now set, it was time to search for this mystical tripod that is cheap like a manfrotto and built like a Gitzo begins! After looking around all the Photography sites, a brand called Oben Tripods keep popping up with some great reviews and fit almost everything i was looking for. I ordered a Oben CT-2381 Tripod with the twist locks from B&H Photo on that was on sale for $299.99 and that is about $50 off the normal retail price of 349.99. The Twist locks is one thing that i loved about the Cheap Chinese knock off so i wanted to bring to the next tripod. I received the tripod with flat rate shipping in about 2 weeks.
 |
| Me in a Pool in Singapore. |
 |
| Oben CT-2381 with the 3 sections fully extended. |
Oben has put themself in a very nice area where they are making quality items at a great price. I know that it might not have the fine Finnish that some brands offer like Really Right Stuff but it does the trick. The only thing i would have added to this set up is some foam type grips on the large part of the legs to help with the winter cold. The Tripod holds its own when i place my 70-200 F2.8 with a 5Dm3 and its rock solid. I would be scared to death to put that on my old tripod.
 |
| Oben CT-2381 looking at the Marina Bay Sands. |
Over all i think this is a very solid tripod that i would not hesitate to purchase again and again. So if you are looking towards a great tripod that will not set you back a crap load of money, This is your Tripod.
Cheers,
Heath
Thursday, January 15, 2015
Wednesday, January 14, 2015
Tuesday, January 13, 2015
Saturday, January 10, 2015
My Top 10 Images from 2014
Last year has been a interesting year with traveling and exploring and with my work. Along with seeing new parts of the world and learning new things from people in real life and from my favorite.... YOUTUBE. So i just wanted to post my Top 10 Favorite images of 2014. SO here they are! I am also working on a Ebook and some Google Maps for the best spots to see in each part of the city. Plus am working on posting more to my YouTube and Blog more often. Till then, Cheers!
#1
#2
#3
#4
#5
#6
#10

#1
 | |
| This is my Number 1 Image i think. This image started me down the road of light trails |
#2
 |
| This image is my #2 cause this is the one that i had to learn how to clone and recreate part of the image to remove a tree limb. |
 |
| This is my #3 cause it was my first time blending Light trails with a HDR image. |
 |
| This is my #4 image cause from what i learned from #3 and took it to the next level and did it with the lasers |
#5
 |
| This is #5 cause this is when i realized that my camera was weather sealed and i could get some amazing shots in crappy weather. |
 | |
| This is #6 cause this is the time i figured out how to shoot with with glass in front of me. |
 |
| #7 I started to explore more and found this spot and used what i learn from #6 to make this amazing shot of Shibuya crossing. |
#8
 |
| #8. learning how to get over the fear of shooting people. I started a project that i had to shoot people but had to wait for them to look at me. Check out more are..... |
#9
 |
| #9, learning to go back to past spots and learn how to look at things different and make it better. |
 | ||
| #10, Taking a note from +Trey Ratcliff on doing multiple layers of focus. |
And my runners up are.....
 |
| Snow Monkeys of Nagano |
 |
| Rainbow bridge on the Google+ photowalk |
 |
| Shibjuku On my photowalk with eyexploretokyo |
 |
| Google+ Photo walk Tokyo |
Sunday, December 28, 2014
Hello and Yes, Am not dead.
Sorry for being away so much, just been really busy with work and everything else to takes up my spare time..... like a job. Well after doing some searching and looking around the web i have came up with a few answers about my life. 1) You have to have a job to keep living, and 2) work sucks, plan and simple.
So i have been looking into creating something for the masses. Its going to be a guide book about Tokyo and the places that i go to and see. It will have "how to get there" directions, best times to see things, and what to do for photography....(i am a photographer, only makes sense too).
And i have been doing a lot more you tube and think i will try and start that back up. So i leave you with this, a fast edit of a image i took a few days before Christmas. Please like and subscribe if you thing you want to see more of this!
So i have been looking into creating something for the masses. Its going to be a guide book about Tokyo and the places that i go to and see. It will have "how to get there" directions, best times to see things, and what to do for photography....(i am a photographer, only makes sense too).
And i have been doing a lot more you tube and think i will try and start that back up. So i leave you with this, a fast edit of a image i took a few days before Christmas. Please like and subscribe if you thing you want to see more of this!
 | |
| After |
 | |
| Before |
Sunday, October 5, 2014
How to Create Realistic images with HDR.
http://youtu.be/_D4hvXvWbBM
Saturday, September 20, 2014
Review of the Golla GARNET Pro Sling Camera Bag.
So i have this brand new camera sling bag that looks military on the outside and bright red on the inside. If you are wanting something that stands out, This is the bag for you!
So i have been using this bag for a few months now and i have fallen in love with this thing. its my go to bag when ever i need to take my gear out and not worry about a large camera bag. its can easily be brought to the front of your body with out taking off the bag and grab what ever gear you need..... FAST AND EASY!! all with out missing a beat. The large padded strap has a nice rugged buckle that you can un clip to remove or put on the back with out raising the strap over the head(very nice to have this feature in a tight area like a subway car or a restaurant). The bag also has a nice handle on the top of the bag that feel good in the hand. Over all this bag fits every aspect of what i was looking for!
 |
| Top down view. |
 |
| Side view, you can see the 2 front pockets and the main compartment. |
This bag is made out of a strong durable material and padded structure protect your equipment in any situation that you get your self into. This bag has 4 different pockets in total that fit your every day gear. 2 smaller ones that face away from the back of the body for spare items like battery's and spare cards. I use these for items like a GoPro for Time-lapse along with spare travel good that i might need. 1 Ipad pocket that will fit your ipad with a medium size. That brings us to the main compartment for your camera gear, This compartment is sporting a bright red color and comes with 3 dividers for your ever changing gear setup and a zipper net pocket under flap so you can store small items like battery's and cards and such. This huge open compartment can easily fix a Canon 5Dm3 with a 70-200 F2.8 attached and have space for a few other lenses in this main compartment. You would still have the outer 2 pockets and the Ipad pocket for other gear as needed. But the biggest selling point for this bag was the 2 straps for the Tripod holder on the side that most sling bags DO NOT have.
 |
| the top view with the main compartment open. you can see the flap with the zipper pocket, and the 3 dividers that i arrange to manage my gear. |
 |
| My IPad 2 with a hard case fits in the back sleeve pocket. some times i even forget i have it in there. |
 |
| Just to show you how much space you really have, here is the 70-200 F2.8 with lens hood. I can still fit 2 more lens and a body and a flash in the main compartment. |
 |
| Me with the camera bag on. very easy to use. just sling it to the front to grab any gear. |
Thursday, July 3, 2014
How to get Long Exposure Light trails In a HDR image.
One of my Favorite places to shoot and just explore is the streets of Shibuya. So last week i wanted to re-create one of my images that i took earlier this year but this time i wanted to have the traffic coming towards me with long light trails coming towards me. So i started to look around the area and looking on 500PX i found a few images that had the look i was trying to get. However i wanted to do a HDR of it and put my little spin on it. So i had a place and a plan on how to go after this new shot i have been thinking of. Here is the image (pictured below) that i was wanting to re-create that i did after i seen Trey Ratcliff image.
So i took the local train to Shibuya station and went to the spot that i had picked out earlier that week. It was a little median that divided the lanes of traffic heading north and south. So i went to the spot and started to set up my gear and looking for the best composition that would show off the local area and get the light trails of the traffic that i was looking to capture. I set up my Canon 5D Mark III with my 17-40 F4L on my Manfrotto 293A4 tripod. I really enjoy this set up and how handle and what i put it through. I started to use a remote timer over the last few weeks to reduce camera moment and get that sharper image i look for and it working just fine. Its the Neewer LCD Timer Shutter Release Remote Control. Its a fraction of the price of the name brand Cannon remote, but it works just the same as the high end one. The only down side is that there is no ON/OFF switch so you have to remove a battery to keep it from draining the battery when not in uses. Here is a video of what the whole set up looks like in action.
 |
| My first shot of the intersection. |
So i took the local train to Shibuya station and went to the spot that i had picked out earlier that week. It was a little median that divided the lanes of traffic heading north and south. So i went to the spot and started to set up my gear and looking for the best composition that would show off the local area and get the light trails of the traffic that i was looking to capture. I set up my Canon 5D Mark III with my 17-40 F4L on my Manfrotto 293A4 tripod. I really enjoy this set up and how handle and what i put it through. I started to use a remote timer over the last few weeks to reduce camera moment and get that sharper image i look for and it working just fine. Its the Neewer LCD Timer Shutter Release Remote Control. Its a fraction of the price of the name brand Cannon remote, but it works just the same as the high end one. The only down side is that there is no ON/OFF switch so you have to remove a battery to keep it from draining the battery when not in uses. Here is a video of what the whole set up looks like in action.
Now that we have seen the whole set up to capture the images that i needed. I set up the Camera to do a set of 5 exposures to try and capture all the dynamic range of light in this area.
 | |
| Final Image |
 |
| 6 images that i used. |
I shot a -2 / -1 / 0 / +1 / +2 for 5 shots plus 1 shot at -4 for just the highlights of the signs. But that hard part of this was just trying to time it just right for the light trails i was looking for since i was working with shutter speeds of 1 secs or more. I think it took about 7 or 8 attempts to get the buses and the streaks in the right part of the frame. I wanted to get the light trails very close to me in the frame but still leading back towards the intersection. Best thing i have learned from doing this kind of stuff is just being patient and good things will come to you. Cause right when i was about to give up, I had 2 buses go by at the same time! how cool is that!!!!
So now i have the images with the light trails that i been wanting to capture. All i have to do now is create the image that i have been wanting to create. I use Photomatix/Lightroom 5/Photoshop CS6/ and NIK plugins. I know that its a lot of software use to create one final image but every single one has something that i need from it. I could make a very long video just on editing but i will leave that for another day. till then, get out there and explore!
Wednesday, June 18, 2014
How to shoot through a window and not get a reflection!
Step 1: Take the lens hood off of the camera.
Step 2: place lens against glass.
Step 3A: if not does not sit flat against glass, place some clothing that are dark over camera and lens so it removes the rest of the light.
Step 3B: take photo.
So very simple!!! Step 3A can be a pain but if you got a jacket, just place it over your head and your camera and place your hands over the whole set up to kinda shield the camera away from any lights. this should do the trick.
well here is a little video on how i was able to capture this image.

Thursday, May 29, 2014
How to create a TimeLapse with a GoPro and a Egg Timer.
A while ago i picked up a GoPro Hero 3 black edition just for the pure reason that every one had one. I found that it took some amazing video that gave me a different view that i could not have gotten from a large DSLR. So as a photographer at heart i played with it taking still images. It takes images at 4,000x3,000 pixels (12 Megapixels) and does it just fine so this camera and lens set up its not that bad to start with.
First things first, how to set up the camera. You go to the time lapse setting on your Gopro. Once you get on that menu it will ask you what setting you want the GoPro to take a image, what it mean is the interval on how often it will take a image. Right now it will take a image every 0.5, 1, 2, 5, 10, 30, 60 seconds. here is a little cheat sheet that i use when i want to find out how often i need to fire the camera.
1 second
Moving traffic, Fast moving clouds Drivelapses
First things first, how to set up the camera. You go to the time lapse setting on your Gopro. Once you get on that menu it will ask you what setting you want the GoPro to take a image, what it mean is the interval on how often it will take a image. Right now it will take a image every 0.5, 1, 2, 5, 10, 30, 60 seconds. here is a little cheat sheet that i use when i want to find out how often i need to fire the camera.
1 second
Moving traffic, Fast moving clouds Drivelapses
1 – 3 seconds
Sunsets,
Sunrises,
Slower moving clouds,
Crowds,
Moon and sun near horizon (or telephoto)
Things photographed with a telephoto
15 – 30 seconds
Moving shadows,
Sun across sky (no clouds) (wide)
Stars (15 – 60 seconds)
Longer
Fast growing plants (ex vines) (90 – 120 seconds)
Construction projects (5min – 15min)
Once you select your time interval that you want. set the camera down and wait. You can also place the GoPro on a egg timer(something that move very even and slow) to create a moving time lapse. So now you let your camera shoot for about 30 mins and you have all these files on the GoPro and you now need to get them into a video. This video below will show you how to do it, Please watch and enjoy!

Once you select your time interval that you want. set the camera down and wait. You can also place the GoPro on a egg timer(something that move very even and slow) to create a moving time lapse. So now you let your camera shoot for about 30 mins and you have all these files on the GoPro and you now need to get them into a video. This video below will show you how to do it, Please watch and enjoy!
Big things to take away from this is that you need to make it smooth. If you have done everything right and take the images at the wrong interval it will end up being choppy and that is not very pleasant to the eye. So i try and keep this little set up in my bag so when i out taking still images with my main camera like this one. I can still create something on the side that requires just me starting and stopping it.
So i hope you enjoyed this and i hope that you will go out and try this sometime. At the end of the day i love to have as much media that i can have from one location. Even if it never sees the light of day, i still have it for a later day to enjoy or even edit when i found a new way to edit things. I leave you all with this video that i took with a GoPro and a Iphone 5s.
Wednesday, May 21, 2014
Life after Marlbaro Black Book Photo Contest.
First things first! A little recap on how this all came about. Last year as i was wondering the streets of New York City and i got a email from Marlboro. I was dumbfounded by this email. I opened it up and low and behold it said that i was a finalist of the Black Book Photo Contest. I almost dropped my phone on the streets of NYC when i seen this. I wrote this contest off months before this just thinking that i had no chance at this. So after i called up the nice lady at Marlboro and said that i had 2 days to turn in the required paper work so i can keep my spots was a little nerve wracking. Ok, with that said lets fast forward to now. Here are some images that i posted on my facebook. Got a Welcome package and here is a image of the gear that i won. I did walk away as a winner of 2 of the 4 contest that we competed in. Winning the Model shoot really made me want to get more into portraits.
 |
| Welcome Package from Marlboro |
 |
| The Gear i was given to work with. |
So i am home now(Tokyo) and enjoying every moment out here. Exploring every weekend and just trying to move to the next level in my photography. I feel like i have upped it to the next level and am creating images that am very happy with. I figured out a new work flow that lets me back up, import, edit very fast in different programs, and export and back up in different places very fast. To compare this to what i was doing before, well lets just say i that i have cut down my time spent in front of the IMac from "8 Hours" to maybe 1-2 hours for a editing session.
I now also started to use Iphoto to help organize my photos more then just a folder that says "done images". It lets me rename and add a description PLUS add a location to it also. I can export also to different media sites like my Flickr and my Smug-mug site with just a click of a button now. Saving me time that i could use in other places. I did this cause the fact that if i do want to take it to the next level i must be efficient with my time.
 |
| Image taken with the Iphone 5S in Tokyo. |
 |
| Some of my new landscape shots |
 |
| My street Photography stuff. |
Heath
Wednesday, May 14, 2014
Photographing Shinjuku
If you are like me and take the train every time you want to get around, this train station is very large and could have you looking for the right exit, real fast! So, you are out of the train station itching to get some great photos. I am a Landscape photographer at heart and this place has so many look outs. From the walk bridges and tall buildings that surround shinjuku, you could be here for weeks and never find them all. One of my favorite spots is the Tokyo metropolitan building. The few reasons are 1. It's tall, 48 floors in total. 2. You can see and photograph Skytree, Tokyo Tower, and all the buildings around it. 3. The best reason of all....... IT IS FREE! In Tokyo this is so freaking rare. The only 2 downsides to this place is the fact that you can't use a Tripod and the south tower closes early. I would say that this place is a very solid place to come and see for an amazing rooftop type shots of tokyo.


I could go on about "This spot" or "That spot" but i would rather you go out and explore it yourself. I found that if you just go out and just wonder the streets, you will find new spots that no one has ever thought of shooting before, or you can just find a spot that everyone else has shot to death.

Last thing i would say is that this place is a Street Photographer's heaven. There are all kinds of people that hang around this area of Tokyo. Am talking about an old lady with a $8,000 hand bag, and god knows how much else she has on her to the homeless guy right next to her. Then right down the street are a bunch of drunk 20 somethings coming out of Yakitori Alley. So please, get out and have fun. It's well worth the trip to this amazing spot!


Tuesday, May 6, 2014
My New Life Here In JAPAN!
Well I Moved to Japan. I guess the title could have told you that from the start but i just wanted to make that clear for some of you:) So i now live in one of the most populated areas in the world. Just to put it into terms of how long it takes to get around, my 2.3 mile drive home from work every day can some times take 45 minutes...... Ow so much fun right there.
So you are in a new place, you love to explore, and you take photos. Then what do you do? YOU GO CRAZY FOR A FEW MONTHS! I have been traveling all over the Tokyo Area seeing the sights, tasting the food, and putting alot of miles on my shoes. I have found a few well known spots to photograph and some "Hidden" spots that are a little gems of mine. One of the very first spots i have been to in Shibuya is pictured below. In this post we are going to talk mostly about Shibuya and the sights to see around there and the Spots that i love to shot.

Shibuya is one of the most famous spots in all of Tokyo. The reason being is the crossing and the mass amounts of people that cross it every 45 seconds. When the lights turn green and the people begin to cross, there some times can be upwards of thousands of people that walk from all 4 corners to the middle and to get to the side that they want to get to. In short, It is a mad house!

This is a calm night here at the shibuya crossing. This is one of the a few views you can take of the intersection but its one of the "hidden" secrets. To get to this crossing is rather a difficult one once you find out how to get to it. Am not going to tell you how to get to it, but if you just look at the images, i bet you will be able to find out how to get to it. Just make sure that you treat it with respect so we can keep this spot open for fellow photographer to enjoy.


If you cant find this spot there is a ton of other great spots here that are just asking to be photographed. You can post up in a corner of the intersection and shot that way, or go to the starbucks that has windows and seating for people to enjoy a cup of coffee and take in the view. Just like this video shows.
Either way you can't go wrong by heading to Shibuya. It's a youthful, energetic, and fast paced area of Tokyo that is always changing. Things to bring would be
-Any camera, Even a Iphone will do
-Tripod, Just in case you want to do some long exposures.
-A wide and standard lens. I come to this place with a 17-40 F4L and a 50 F1.4
-Your appetite, There is a ton of great places to see and eat at.
So get out and have fun!


So you are in a new place, you love to explore, and you take photos. Then what do you do? YOU GO CRAZY FOR A FEW MONTHS! I have been traveling all over the Tokyo Area seeing the sights, tasting the food, and putting alot of miles on my shoes. I have found a few well known spots to photograph and some "Hidden" spots that are a little gems of mine. One of the very first spots i have been to in Shibuya is pictured below. In this post we are going to talk mostly about Shibuya and the sights to see around there and the Spots that i love to shot.
Shibuya is one of the most famous spots in all of Tokyo. The reason being is the crossing and the mass amounts of people that cross it every 45 seconds. When the lights turn green and the people begin to cross, there some times can be upwards of thousands of people that walk from all 4 corners to the middle and to get to the side that they want to get to. In short, It is a mad house!
This is a calm night here at the shibuya crossing. This is one of the a few views you can take of the intersection but its one of the "hidden" secrets. To get to this crossing is rather a difficult one once you find out how to get to it. Am not going to tell you how to get to it, but if you just look at the images, i bet you will be able to find out how to get to it. Just make sure that you treat it with respect so we can keep this spot open for fellow photographer to enjoy.
If you cant find this spot there is a ton of other great spots here that are just asking to be photographed. You can post up in a corner of the intersection and shot that way, or go to the starbucks that has windows and seating for people to enjoy a cup of coffee and take in the view. Just like this video shows.
Either way you can't go wrong by heading to Shibuya. It's a youthful, energetic, and fast paced area of Tokyo that is always changing. Things to bring would be
-Any camera, Even a Iphone will do
-Tripod, Just in case you want to do some long exposures.
-A wide and standard lens. I come to this place with a 17-40 F4L and a 50 F1.4
-Your appetite, There is a ton of great places to see and eat at.
So get out and have fun!
Subscribe to:
Posts (Atom)